Welcome to Life at the Holman's.


This blog is my way of sharing some of my thoughts and ideas. As the children age and become independent, I find myself with an empty space. Years of homeschooling and child-rearing focus has transitioned to more time to focus on the things I enjoy. One of my greatest pleasures is cooking. I enjoy making sweet treats for my family and friends and preparing meals that bring a smile to my husband's face. I like finding new ideas that help to make life easier. Enjoy!
Showing posts with label let's be frugalistic. Show all posts

Friday, October 22, 2010

Pumpkin Puree

Homemade pumpkin puree is a fairly inexpensive way to enjoy some very tasty goodies.  A few years back, I decided to make my own pumpkin puree for the first time.  I purchased 2 medium size and one large pumpkin for $5 from a local farmer who was selling them in a plaza parking lot.  I took them home, and began preparing them for pureeing.  Of course, we carved all 3 pumpkins before cutting them up for cooking!
2006 pumpkins....soon to be puree!
This year, I decided that I wanted to make my own puree again.  After all, it is not very hard, and the end result is excellent tasting free pumpkin puree.  I began researching how to puree pumpkin.  In 2006, I cut the pumpkin into strips, peeled it, and then cut it up before cooking.  I cooked the pumpkin in the oven on 350 until it was tender.

I decided to "google" how to puree pumpkin and see if there was another way I could puree it (and to help refresh my memory as to how I had previously pureed).  I found some really good illustrated directions at thepioneerwoman.com.  Here is the link to the directions.  She also had a lot of really beneficial ideas.  First, the use of freezer bags that can easily stack and take up less room in the freezer was a great idea for me.  Last time, I used the 16 ounce containers. It works as well, but it does take up more room.   Also, turning the opening of the bag out before putting pumpkin in it really helped cut down on mess when you try to seal the bag.  I did not have the mess around the rim of the bag from putting the spoons of pumpkin in.

I decided to give the Pioneer Woman's method a shot.  Here is what I did this time:
Step-by-step Pumpkin Puree 
  1. Choose your pumpkin.  I chose a larger pumpkin that was on sale at my local supermarket for $3.33 each.  
  2. Preheat your oven to 350 degrees.
  3. Use a butcher knife to cut out the vine topper.  
  4. Let your kiddos remove the "slim" and the seeds from inside.  Save the seeds for making toasted pumpkin seeds!  
  5. Cut the pumpkin in half from the stem to the bottom and around.  Use a metal spoon to lightly scrape all the goo from the inside.  
  6. Cut each pumpkin half into strips and lay the strips on cookie sheets for baking.  
  7. Bake for 45 minutes to 1 hour until your pumpkin is tender.  
  8. Remove from the oven and allow to cool for some time in order to be able to handle it easily.  
  9. Remove the outer skin by peeling it away.  
  10. Cut the cooked pumpkin into pieces and put it in a blender.  
  11. Puree until smooth.
  12. Put 1 cup of pumpkin in each quart freezer bag.  I used a scale to weigh 8 ounces in each bag.
  13. Flatten the bag to remove most of the air and seal the bag.  Lay flat to store in the freezer.
Here is what we ended up with:


16 - 8 ounce bags of pumpkin puree


Seeds for drying


Toasted Seeds - take about 2 Tbsp. melted butter
 and top with salt.  Bake for 15-25 minutes (depending on your oven)  until golden brown
 Tips:
  • While the above method is good and worked just fine, I have to say that I think the other way was maybe a little easier in the long run.  When I peeled the pumpkin and already had it cut into chunks, it seemed to cook faster and more evenly.   
  • I added about 1 Tbsp. of water to a full blender of pumpkin to help it along in the pureeing process.  It just seemed to blend smoother.  
  • 1 full blender of pumpkin chunks for my blender yielded about three 8 ounce servings.
  • I tried to use a food processor (small one), and it did not work very well.  The small food processor was taking too long.  I decided switch to my blender so that it did not take forever to finish.  It also seemed to give a more even consistency.
  • I froze the pumpkin in the 8 ounce portions because that is the amount of half of a small can of pumpkin that you buy at the store.  When I make a recipe, I usually only need 1/2 of the can.  This way I have just what most of my recipes call for.  
  • I placed my completed bags in stacks in my refrigerator freezer in a 9X13 pan to do the initial freezing so that they would freeze flat.
  • The 16 ounce sour cream or butter containers work well for storing the pumpkin in the freezer as well.  They hold the same amount as a small can of pumpkin.
  • I had no idea that cooked pumpkin actually tastes pretty good (sort of like a cross between a squash and a sweet potato) when it is baked.
That is about it.  I look forward to sharing some of the things that we use our pumpkin for in the near future.

As far as cost, here is the break down.  We paid $3.33 for the pumpkin (about 12.5 pounds) and $1.00 for the freezer bags (40 bags for $2.50).  Of course, we did have the propane for our stove, but I have no way of figuring that in. I know that it was not much though.  So...for the extras in gas, we will round up and say that we made 16 - 8 ounce servings of pumpkin puree for roughly $.38 each.  That would result in a can of pumpkin costing about $.76, and  homemade is healthier without all the additives and preservatives.  Plus...the kids had a great time getting slimy!

Then, there is my least favorite part...the clean up!  I would never win the award for "the clean cook."  I like to have a clean kitchen when I start, but I sure seem to get it messy when I am cooking!


1 Small Can Libby's Pumpkin = 15 ounces or 2 of my frozen baggies.  If you typically use a whole can of pumpkin, you can either a freeze a full 15 ounces in one bag to save on bags, or you can fill a sour cream bowl (the kind you reuse from the store when they are empty).  The sour cream/small butter bowl filled almost to the top will equal a small can of Libby's pumpkin (don't fill to the top because you have to have room for freezing and expanding). 

Wednesday, September 1, 2010

Paint update!

Well, I have finished the living room and kitchen painting.  I do have to say...it was a lot of work.  The kitchen was time consuming because we had to have multiple layers of paint on the cabinets to cover the "country blue" that was previously there.  Here are some before and after pictures:
Doorway
Table and entry way


Upper Cabinets
Corner Area


Wall after first layer of paint on the chair rail high blur
Lower kitchen cabinets after first layer of yellow
Finished lower cabinets
Here is the finished product:
We took off the upper cabinet doors that were useless space.  When the people put in the new ceiling, they put runners down the ceiling.  This, in effect, blocked the upper cabinets from being able to open.  We only had access to 2 of them and never used them because they were dark and dingy.  We decided to open them up and paint them.  Now they just store my big kitchen items.  We took out the mini-blinds, and now our back window opens up into an open cow pasture so the only thing that would see through that window from the outside was the cows!  I am currently looking for material that I like to be able to make a valance for the window and door.
The below pitcure shows the rolling cabinet (to the right of the stove) that Jason is in the process of finishing for me.  He is going to top it with counter top.  It is on wheels because there is actually a hidden cabinet that is in the corner, and it is the access to our bathroom pipes that is located on the other side of this wall.  I also painted my spice rack (originally dark wood in color) to match the cabinets.  

Everything else (base boards and walls) have been painted Shetland Grey.  It actually looks white unless you hold a bright white up to it then you can see the faintest hint of grey.


That about sums up the kitchen.  It is so much nicer than it was.  Before, it was very dark and depressing.  Now, we have our own bit of sunshine when we walk in the kitchen.  

Final cost for the kitchen was $7.48 on half price rack at Wal-mart and many hours of painting (3 coats in all).  We only had to purchase the white paint because we had the yellow left over from painting the kids doll house a couple of years ago.  

Later, I will show the finished product of the living room and hopefully the bedroom as well as talk about the importance and reasons for purchasing high quality paint.

Monday, August 2, 2010

Painting and Great Deals!

We recently decided it was time to paint the inside of our house.  The kitchen was in great need of painting, and the rest of the house had an interesting array of colors (not bad, just not what we would have chosen)!  We are renting, so we have not wanted to spend the time or extra money just to change colors.  However, after living here for 2 1/2 years, we decided to go for it.

Jason had built the kids a doll house a couple of years ago, and there was almost a full gallon of yellow paint left over.  It is a bright yellow, and we were not sure if it would be too overwhelming in our small kitchen.  I also new that the dark country blue that was in our kitchen would need either primer or extra coats of paint to cover it up.  So, I began with the bright yellow intending to purchase a softer yellow to finish the final coat.  After all, it was not going to cost us anything to get started because we already had the paint.

We also began looking for discounted paint at Lowe's and Wal-Mart.  You can get really good deals on the mistint paint as long as you are patient and not extremely picky about color.  We found a semi-gloss "Shetland Grey" (which is almost white) for the walls in our kitchen.  You can not even tell it has any grey in it unless you hold a bright white up to it.  We paid $7.48 for the gallon (half price).

This week while Jason was purchasing supplies at Lowe's for one of his handyman jobs, the kids and I decided to check the paint aisle.  We had already looked the week before so I was not expecting much.  However, there were 2 gallons of a light beige color (just what I was looking for!), and both were marked at $5.00 per gallon.  It is the Valspar Signature Color.  When we went to check out, the original price was $35 per gallon.  I paid a total of $10.98 for $70 worth of paint, but that is not the best part.  When the cashier rang out my purchase, there was a $5 mail-in rebate per gallon that printed out with the receipt.  All I had to do was fill out my name and address, pay for a stamp, and put it in the mail box leaving a grand total of 2 gallons of high quality paint costing me $1.42 (tax and a stamp).

We will be painting our whole house for under $15 in materials (when we get the rebate back)!  I have almost finished the kitchen.  I will post before and after pictures as soon as I am done with each room.

Sunday, June 6, 2010

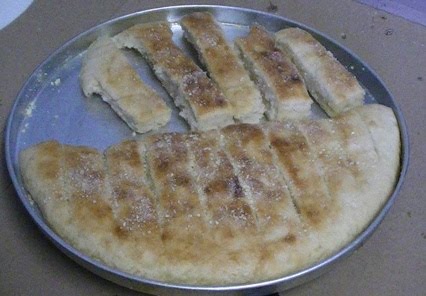
What's for Dinner? - Little Caesar's Copycat Crazy Bread

We are definitely a bread eating family at our home.  My son and my husband are especially fond of just about any type of homemade bread I make for them.

Here is another recipe that our family really enjoys.  It is a copycat recipe for the Little Caesar's Crazy Bread that you buy at most Little Caesar's Pizza restaurants.  We usually have this bread once a week with a pasta dish or along with our homemade pizza.  It is so easy and can be completed from start to finish in about 35-40 minutes!


Little Caesar's Copycat Crazy Bread
Ingredients:
1 cup warm water
1 package yeast (or 2 ¼ tsp. of bulk yeast)
2 tsp. sugar
2 ½ cups Flour
1 tsp. salt
3 Tbsp. Butter
1/2 to 1 tsp. garlic salt


Directions:
Mix warm water, yeast, and sugar together and set aside for 10 minutes until foamy.  
I use my hottest tap water.  You need the temperature of your water to be roughly 110 degrees and no more.  
Add the flour and salt.  Mix well and knead for 4-5 minutes until a nice pliable dough forms.  Set the dough aside for 10 - 15 minutes to rise.  
Flatten the dough in a pizza pan and use a pizza cutter to cut the flattened dough into "sticks" (about 7-8 times across and once the opposite way across the middle).  


Allow the "sticks" to raise for about 10-20 more  and bake at 450 degrees for 6-8 minutes or until golden brown.  


While baking, melt 2 tablespoons real butter (not margarine).  Add ½ to 1 tsp. of garlic salt to the butter (check the taste as you add the garlic to see how garlicky you like it).  


When the bread sticks are removed from the oven, immediately brush them with the garlic butter mixture on the top and bottom.  Then, lightly sprinkle Parmesan cheese on the top.  


Tips:
1.     Real butter is a must for me in order to get that true copycat bread stick flavor.  I have used margarine, and while it is good also, the real butter enhances the flavor much better.
2.     This recipe can also be used as a pizza crust.  Just press the dough into the pan  after the first 10 minute raising time and "decorate" it as you would your favorite pizza.  If you use a 12 inch pizza pan, it will produce a thicker dough.  Or, you can divide it up into a couple of pans or one larger pan.  Bake at 425 degrees until cheese is bubbling and lightly browned.
3.     I use my toaster oven.  It cooks quickly, doesn't heat up my kitchen as much in the summer, and it gives the top a nice browned look.  However, if you use the toaster over, make sure you turn the bread half way through the cooking process. I usually cook the bread sticks for 4 minutes and then turn them to cook for another 3 minutes.  My toaster oven only takes about 7 minutes for the cooking time.
4.     Another great way to raise the bread sticks for the final rise time is to set the bread stick pan on top of the toaster over and allow the heat of the oven to raise the dough more quickly.  The top of my Black & Decker Toaster over gets really warm.  There is just enough room between my oven top and the bottom of the cabinet to be able to provide a nice "proofing" area.
5.     Here's a thought...When you purchase Crazy Bread from Little Caesar's, you spend about $1.29 for an 8 piece bag.  These are so much cheaper to make.  Making them homemade you get a little over twice the amount (about 18 pieces) and pay roughly $.25 to $.30. 
6.     I make a lot of homemade breads at our house whether it be pretzels, doughnuts, bread sticks, or bread rolls.  So, I purchase the bulk packages of yeast at Sam's Club.  It comes in  2 - one pound packages (2 pounds) of yeast for about $4.50.  A one pound package of yeast is roughly 42.66 of the individual packets of yeast that you purchase typically in a 3-pack at most grocery stores.  In essence, I pay approximately $.15 (my would be cost for a 3-pack) for what is typically $.99 -1.29  at the grocery store.  It is a great way to save, and the yeast lasts a long time in a sealed container or Ziploc bag!
Mmm...Mmm...good!

Sunday, May 23, 2010

Murphy's Gas (Wal-mart Gas Stations) Coupons!

For those of you who have a Murphy's Gas in your area (these are the gas stations that are found at Wal-Mart), they frequently offer discount coupons on gas, diesel, and sometimes sodas.  If you sign up for their e-mails, they will send you an occasional e-mail announcing their deals and often give you an opportunity to print off a coupon.

The coupons are typically for a specific short time frame so make sure you read it.  Today, I printed off a $3 off of a $10 gas purchase coupon that is good today and tomorrow only (May 22nd and 23rd).  If you are interested, here is the link: http://murphyusa.com. All you have to do is visit the link and click on the the image in the upper right hand corner that says "Murph e-offers Sign Up Now!"  to register for their e-mails.

Disclosure:  I am not in any way connected with Murphy's.  I just wanted to pass along this great method of savings!

Friday, May 14, 2010

What's for Dinner? - Fried Chicken

Mmm, Mmm, Finger Lickin’ Good…
Fried chicken is one of the meals that I have definitely had to learn over time.  When we were first married, I actually tried to make fried chicken for my husband.  The only real comment he made was, “You know, you don’t have to make fried chicken for me.”  Of course, I knew what he really meant…Please do not attempt this meal again.  I have to admit that it was not very good. 

Several months ago, I decided to start looking for KFC style fried chicken copy-cat recipes.  Of course, with the Colonel’s "secret spices," it was really hard to re-create.  I found several recipes and sort of put them all together to come up with my own favorite fried chicken recipe.  Now my family actually requests fried chicken.  Here goes…
KFC Copycat Fried Chicken
Ingredients:
Oil for frying
1 egg beaten
2 cups milk
2 cups flour
½ to1 Tbsp. salt (add to personal preference)
2 tsp. black pepper
10-14Chicken Legs

Directions:
1.  Combine the egg and milk in a bowl.  Place the chicken in the mixture and allow it to soak for a couple of minutes while you are heating the oil. 
2.  Place about 1 inch of oil in a counter- top electric skillet.  You can also use the stove top and a large skillet.  I just prefer to use the electric skillet because it keeps the heat of the oil regulated.
3.  Heat the oil until it reaches 350°. 
5.  Mix flour, salt, and pepper together in a separate bowl. 

5.  Place the milk-soaked chicken in the flour mixture to coat. 
6.  Place the flour-coated chicken in the hot oil. 
6.  Allow the chicken to fry untouched until you can see it turning a golden brown around the edges (5-7 minutes). 
7.  Once the chicken has begun to brown, turn the chicken and allow to brown on the other side. 
8.  Allow the chicken to cook until the juices run clear, turning it occasionally for even browning (about 25-35 minutes for chicken legs, longer for other larger pieces of meat).
9.  Serve hot with mashed potatoes, gravy, cole slaw, green beans, corn, and homemade biscuits!

Tips:
  • To check the readiness of your oil, toss in a pinch of flour.  If the oil is hot and ready, you can begin carefully placing your chicken in the hot oil. 
  • Make sure you to not turn the chicken too soon or the breading will begin falling off.  You must wait to move the chicken until you see the brown forming. 
  • I usually use the thickest piece of meat to cut into and make sure the meat is cooked all the way through.  
  • If you like the extra crispy style chicken, dip the chicken in the egg mixture a second time and then dip it in the flour again.  This will produce a thicker, crispier breading.
  • Money saving tip: Since my whole family likes fried chicken legs, we purchase the 10 lb. back of chicken from the grocery store (about $6.80) and use the chicken legs for fried chicken and save the thighs for other meals.  We usually end up getting about 12-14 legs in a bag.  A 10 pound bag of chicken can then be spread over 3-4 meals for our family of 4.  It makes for fairly cheap meals!
Some of the actual KFC copy-cat recipes that I found actually have you use a pressure cooker for cooking and tenderizing the meat.  When I first started trying out the various recipes, I did use my pressure cooker.  It does a great job at cooking the meat, and it creates a tender, fall-off-the-bone result.  We still use the pressure cooker method occasionally, but I have found that it has a bit more clean up and must be watched a lot more carefully.  So, while we do enjoy the pressure cooker method, I usually opt for the electric skillet. Below is the directions for cooking the chicken using the pressure cooker. 

Pour oil in to pressure cooker (enough to cover chicken when frying – about 2-2 ½ inches).  Heat the oil to 400 °.  Put 4-5 prepared pieces of chicken in oil and lock lid in place (I have a very large pressure cooker/canner style so I actually do all the chicken at one tine).  Once the steam begins to come through the pressure release valve, set timer for ten minutes.  DO NOT PUT THE WEIGHTED TOPPER ON THE PRESSURE COOKER!  Turn of the heat to the pressure cooker, release the pressure, remove the lid, and take out the chicken to drain.  Make sure you do not leave the chicken sitting in the pressure cooker for too long after you turn off the heat or it will become soggy.