Welcome to Life at the Holman's.


This blog is my way of sharing some of my thoughts and ideas. As the children age and become independent, I find myself with an empty space. Years of homeschooling and child-rearing focus has transitioned to more time to focus on the things I enjoy. One of my greatest pleasures is cooking. I enjoy making sweet treats for my family and friends and preparing meals that bring a smile to my husband's face. I like finding new ideas that help to make life easier. Enjoy!
Showing posts with label What's for dinner?. Show all posts

Saturday, September 7, 2019

What's for Dinner? Quick Yeast Rolls

Yes, you can have yeast rolls on the table in less than an hour!  The following recipe came from friend of mine, Karla W.  This is a recipe that she used at a meal with them while living in Guam.  While the original recipe was for 30 minute Quick Yeast Rolls, I have used it for cinnamon rolls as well as pizza dough.

Quick Yeast Rolls
Ingredients:
1 package yeast
1 c. warm water, 110⁰
2 ¼ c. flour
½ tsp. salt
3 Tbsp. sugar
2 Tbsp. melted butter


Directions:
Dissolve yeast packet in warm water.  Mix in remaining dry ingredients.  Add in butter. 
Knead for 7-8 minutes.  Shape into rolls and place in a 9X13 pans and let rise for 30 minutes.
Bake at 400⁰ until golden brown.  Remove from oven and butter the tops.  Serve and enjoy!

Notes:
Be sure to note what kind of yeast you are using and change the directions accordingly.  If you are unsure how to proceed with your yeast, see my yeast directions here.

Sunday, August 4, 2019

What's for dinner? Sweet and Sour Chicken

I have no idea where this recipe originally came from or what the original recipe looked like, but several years ago, I was looking for a recipe for sweet and sour chicken that was at least similar to the one found in our local Chinese restaurant.  Of course, when I pictured sweet and sour sauce, I immediately imagined the bright red...unnaturally red... sauce found in a large warming pan at the end of a bar at a Chinese buffet.  Actually, I did not even eat sweet and sour chicken (even on the buffets) until first having it at Hunan Restaurant in Jefferson City, Missouri. Yum!
July 2019
Hunan in Jefferson City, Missouri
Notice the bright red sauce
In my quest to mimic this delightful sweetness, I discovered that the red in the sauce was the result of oodles of red food coloring.  


After searching and experimenting, I found a tasty sauce that --as you will see in the photos to follow-- is not red at all. However, I assure you it is sweet and has the perfect amount of tangy sourness! For the chicken, I found a Long John Silvers copycat chicken batter recipe, adjusted it to better fit the fried chicken chunks for sweet and sour chicken, and voilà...Sweet and Sour Chicken!  

Important note:  Don't forget to begin cooking your rice when you start preparing your meal.  When I made this meal today, the chicken was fried and the sauce perfected.  I called my husband to tell him it was ready. He sauntered into the kitchen and asked, "Do we get rice with this meal?"  Whomp, whomp, whomp...I had totally forgotten the rice.

Hope you enjoy!

Let's begin:


Prepare the batter by mixing together all of the dry ingredients. 
Add in the egg and water.  

Mix until well blended. 
Look at those nice bubbles.  
This will help the chicken have the fluffy, textured batter.


Add in the chicken. 


Heat oil to 375-400°.  Drop in the chicken pieces and fry until golden brown.  Do not put too many pieces of chicken in the oil at a time. You want the chicken to have space to fry all around.  Fry until a deep golden brown, approximately 5-6 minutes.  Remove from oil and place on a towel to drain.  At this point, taste a piece of the chicken to make sure it is as tasty as it looks.  

Continue the process until all the chicken is fried.  While frying, make sure you take the time to dip a piece of the fried chicken into the sauce that you have prepared along the way. Be prepared to slap away the hands of those wandering through the kitchen attempting to taste the crunchy goodness!


While the chicken is frying, begin making the sauce.  


Prepare the bell pepper by cutting cored and seeded pepper into 1-inch chunks.  I usually use only red peppers, but I had some yellow on-hand and decided to try something new. You can also chop up onions in large chunks if you want to add them as well.  The onions are optional but a nice addition.

Place the sugar, water, vinegar, oil (1 tsp.), soy sauce, salt, and garlic in a pan and bring it to a boil, stirring occasionally.  
Make a slurry of cornstarch and water. Stir it into the boiling sugar mixture.  Make sure you constantly stir the sauce at this point.  It will thicken quickly and you don't want it to clump or burn.  
Continue cooking and stirring constantly until the mixture is thickened.   As the mixture thickens, it will take on a more glassy appearance. 
After about 10-15 seconds, the sauce will be gelled.  It is now time to add in the vegetables and an 8 ounce of pineapple chunks, juice and all.  Stir it all together and turn off the heat.
Set the sauce aside until the chicken is finished.  Did you try your chicken?  Go ahead and dip a couple of pieces.  Cooks privilege.

When all the chicken is fried, it is time to call the troops and dish it up.  Place a big scoop of rice on a plate, grab a handful of chicken pieces and plop 'em on top of the rice, and ladle a healthy serving of sauce right on top.  Delish!
I had some homegrown zucchini that I fried up with the leftover batter.

This is a delectable recipe for sweet and sour chicken, and it is fairly quick to make.  It takes about 40-45 minutes from start to finish (once you know what you are doing).  Here is the recipe without pictures:

Sweet and Sour Chicken 

Chicken Pieces
Ingredients:
 ¾ c. flour
¼ c. cornstarch
½ tsp. seasoning salt
1 tsp. baking soda
½ tsp. baking powder
1 egg
¾ c. water

Directions:
Mix ingredients together until smooth.  Dip chicken pieces and deep fry at 350-400º until golden brown. 

Sweet and Sour Sauce 
Ingredients:
 ½ c. sugar
½ c. chicken broth or water
⅓ c. white vinegar
1 tsp. vegetable oil
1 tsp. soy sauce
¼ tsp. salt
1 spoonful minced garlic
2 Tbsp. cornstarch
1 Tbsp. cold water
1 small red bell pepper cut into 1-inch pieces
8 oz. can of pineapple chunks

Directions:
Heat together sugar, broth, vinegar, oil, soy sauce, salt and garlic to boiling over medium-high heat.  Stir occasionally.  Mix cornstarch and water.  Stir into sugar mixture.  Cook and stir about 10 seconds or until thickened.  Stir in bell pepper and pineapple.  Serve with chicken and rice. 

Hints:  If the sauce becomes too thick, add some additional water to reach the desired consistency.

I have found that jasmine rice The Instant Pot Jasmine rice recipe found here is an easy way to make perfect rice.  

If you need the "red" to make it feel authentic American Chinese buffet worthy, go ahead and add in some red food coloring to meet your satisfaction. 😉

Saturday, March 3, 2018

The Perfect White Rice in an Instant Pot

I have had my Instant Pot for about a month now and have found my favorite thing, thus far, to make in it...RICE!  It is so easy and has turned out perfect every time. 

In a previous post, I talked about making wild rice, but since then, I have made white rice several times and have decided that my IP is worth it just for cooking rice.  Being able to set it and walk away is wonderful.  It has worked every time to produce the perfect rice texture.  The original directions I used are found at Perfect Pressure Cooker Recipes.

Here is how I make Perfect White Rice in my Instant Pot:
Ingredients 
1 cup rice
1 cup water
¼ - ½ salt (optional)

Instructions

  1. Rinse the rice under cold water for a couple of minutes to wash off some of the outer starches. Drain it well.
  2. Place the rice, water, and salt (optional) in the Instant Pot.
  3. Close the lid and cook at MANUAL HIGH PRESSURE for 3 minutes. 
    After the 3 minutes, use the natural pressure release for 10 minutes and then finish with the quick release.
  4. Remove the lid carefully and fluff the rice.
NOTES:
  • Rice doubles as it cooks, so one cup of dry rice yields 2 cups of cooked rice.
  • You can increase the amount of rice just make sure you use equal rice to water ratio and rinse the rice thoroughly.
  • Jasmine rice is my favorite white rice.  It has a wonderful texture.  
  • I have made it both with the salt and without, and I don't see much of a difference.


Monday, February 5, 2018

Ode to the Instant Pot

Mmmm....cooking.  I really like cooking.  The smile on someone's face when you bring them that slice of warm chocolate cake or fresh baked bread is very satisfying.  I love to try new recipes, old recipes, copycat recipes, etc. Cooking brings me such pleasure.  Creating new dishes brings fulfillment. Visiting a kitchen store makes me giddy.  So, here I sit excitedly awaiting my newest kitchen appliance!  The Instant Pot!  For those of you that are unfamiliar with the Instant Pot,  it is a multi-function appliance that, according to www.instantpot.com , “...has 7 commonly used kitchen appliances in 1; Pressure Cooker, Slow Cooker, Rice/Porridge Cooker, Yogurt Maker, Sauté/Searing, Steamer, and Warmer.”  

I first heard about the Instant Pot several months back when my mother-in-law mentioned having purchased one and really liking it.  At first, I could not justify one more gadget.  However, the taco soup she made for us during our recent visit was wonderful, and it got me to thinking that …..if I purchased the instant pot, I could replace my crock pot, eliminate one of my three pressure cookers, and get the rice cooker that I have wanted for 18 years...all in one device! After all, I had been looking for a new crock pot because I wanted to upgrade to a programmable one that I could actually set a temperature on, and it was going to cost $60-80 for the replacement.  As for the pressure cookers, I have three: a 6 quart, a 8 quart, and a huge canning cooker. I  will be able to get rid of the 6 quart, at least. I would be able to eliminate some extra clutter from our kitchen and get my coveted …rice cooker. 

It is a fairly rare occasion that I will just decide to purchase something for myself.  I love to shop for my husband and kids but seldom have anything that I want badly enough to actually buy for me because I don't like to spend money....translated....I'm cheap!.  A friend had gifted me some money recently.  Sunday, I made the decision to buy the Instant Pot.  I began scouring the internet to figure out what model would best suit our family and what store had the best price. I asked my husband and he was all for it, or at least he was until I inundated him with question after question filling him with far more knowledge about the Instant Pot that I am sure he ever wanted to know.. 

You see, there are several sizes and models to choose from – 3 qt., 5 qt., 6 qt., and 8 qt.  Then there is the LUX, DUO, ULTRA, and Smart Bluetooth.  So much to decide.  I read articles. I contacted my mother-in-law.   I talked to my husband...again. At one point I found myself backing out of it all together and trying to decide if I really wanted one at all.  I hate making decisions, especially when more than one decision will work.

Finally, this article by DadsCookDinner, helped me decide.  Before reading this post, I had all but hit purchase on the 8 quart DUO80. It was when I read his last paragraph that I made my decision. He had purchased the 8 quart but had reverted back to the 6 quart for his family of 5 because of the size. I knew that I did not want an item so big that I dreaded getting it out of the cabinet.  While the 8 quart would have probably been nice at times (and I even second guess myself now!!), I know that for most things the 6 quart will be sufficient. 


After much stress and debate, I hit the purchase on the Instant Pot DUO60 from Kohls.com.  After the discounts and free shipping, it was $89.51.  It is set to arrive tomorrow.  So far, I have joined two Facebook recipe idea groups and started collecting recipes that I would like to try.  There are recipes galore all over the internet.  Looking forward to my new Instant Pot adventure!

Wednesday, November 16, 2011

What's for dinner? - Ozark Apple Pudding

Mmm...mmm...good!  I was online yesterday and found a recipe for Ozark Apple Pudding.  It was on the website TastyKitchen.com. This particular recipe was in the blog tab in the step-by-step recipes.
 
When we found the recipe, both Savannah and I agreed that it was a must that we try it today. While I would not consider it a pudding as the title would suggest, it is a wonderful apple cake and was so easy to make. There is a step-by-step recipe with pictures here. It smelled wonderful while it was baking and was moist and delicious when it was eaten!

I did a couple of things different.  First off, I used 1 cup of cinnamon flavored apple sauce for one cup of the oil and only used 1/4 cup of oil.  I also left off the nuts...one - we were out of them and two - I am not really crazy about nuts in my cakes, cookies, or breads.

Just a heads up...I also made the coconut granola from the same blog area (here is the recipe).  It turned out alright and would have been much better had I not forgotten it in the oven.  It turned out a little on the brown side but was still pretty good.  The kids enjoyed eating it as cereal with milk on top.
 

Wednesday, October 5, 2011

What's for dinner? - Chimichangas, Yellow Rice and Re-fried beans!

Tonight's dinner was another dish from one of our favorite cuisines...Mexican!  We eat a lot of Mexican foods whether it be at home or out at a restaurant.  We recently tried a different Mexican restaurant here in town.  I decided to stray from my usual taco salad and try some chimichangas.  They were excellent! They were not the usual ground beef or chicken filled chimichinga, rather they were beef tip filled (tiny steak bites).  

Before we left, I talked to the waiter at the restaurant and asked how they get their chimichangas to stay together when they fry them. When I tried to make them in the past, the most difficult part was getting the tortilla to stay shut. He said that they actually have a basket that goes around the tortilla that holds it together.  Great!  Back to square one because I do not have that wonderful basket!

Anyway, we tried making chimichangas again tonight. We ended up with our own little Mexican restaurant. JJ had his typical cheese enchiladas, rice, and beans while Jason, Savannah, and I had chimichangas, yellow rice, beans and salad topping consisting of lettuce, tomato, sour cream, and homemade guacamole.  Mmmm!

Here is how we did it:

Homemade Chimichangas

Ingredients:
Chicken, Beef tips, or ground beef seasoned Mexican style
Tortillas (homemade or large store bought)
Mexican blend cheese
Toothpicks
Oil for frying
White melted cheese 
Shredded Lettuce
Diced Tomato
Sour Cream
Guacamole

Directions:
While the oil is heating, stuff your tortillas with a couple of spoons full of meat mixture and about 1 Tbsp. of cheese.  Tightly roll the tortilla tucking in the ends (early in the rolling process) so that the stuffing does not fall out during the frying.  Take a toothpick and use it to close the side.  After all the tortillas are stuffed, then comes the difficult part.
Since I do not have the fry basket, I used 2 tongs to hold the tortilla shut. It is necessary to hold the tortilla shut for a while even though you closed it with a toothpick because it will expand and open up in the frying process. The toothpick only holds the middle so make sure your tongs are toward the ends.
Allow the chimichanga to fry until it is a light golden brown­­­­ turning it throughout the frying process.  Remove it from the oil and allow it to drian on a paper towel.

Chicken Chimichanga Filling
Ingredients:
Boneless Skinless Chicken Breast, cut into small pieces
½ packet of Sazon Seasoning from Goya
Green pepper, finely chopped
Yellow Pepper, finely chopped
Onion, finely chopped
½ tsp. olive oil
Chili Powder
Cumin
Garlic Salt
Pepper

Directions:
Sauté the peppers and onions in olive oil for 2-3 minutes in a cast iron skillet.  Sprinkle the mixture with chili powder, garlic salt, and cumin (just enough to add flavor).  Add the chicken pieces and about 2 tablespoons of water (to keep the chicken moist).  Sprinkle the sazon over the top of the meat, pepper, and onion mixture.  Allow it to fry for about 4-5 minutes until the chicken is cooked.  Do not overcook the meat or it will be dry.  Allow it to cool for a few minutes and then stuff the tortilla shells.

JJ requested that I make yellow rice instead of our traditional mexican (red) rice.  He wanted his meal JUST LIKE the one at the restaurant, and this particular restaurant happens to serve yellow rice!  I did a quick search online and found this recipe at ehow.com.  Here is the link to the exact recipe.

Mexican Yellow Rice

 1 c. rice
 2 c. water
 1 tsp. crushed garlic
 1 tsp. olive oil
 1/2 tsp. Sazon seasoning by Goya
 1/2 tsp. turmeric  (I used ginger.)
 1/2 tsp. salt

Directions:
Add the oil to a sauce pan that is set on medium heat. Add the garlic, sazon, and tumeric (or ginger in my case) to the oil as it is heating. Brown the garlic slightly and then reduce the heat. Add the water and bring it to a boil.  Once the water is at a full boil, add the rice to pot, stir, and return it to a boil. When the rice and water has returned to a boil, turn the heat down to low and allow it to finish cooking. It is important to keep an eye on the rice and stir it occasionally.  If the water boils out and your rice is not completely cooked, add a little bit of water (about 1/4 cup at a time) to keep it from sticking and to give it more time to cook. The recipe says to allow it to cook for 25 minutes, but I typically only let long grain rice cook for 18-20 minutes.  I just check it and see if it is cooked all the way through and soft.

As mentioned above, I used ginger instead of turmeric.  I had Savannah do a bit of research to find out exactly what turmeric was, and she found it to be an Asian plant that is in the ginger family.  That was good enough for me!  I replace the required turmeric with just a dash of ginger (I didn't want to over do it!).  It worked.  The rice was great!

With everything done, it was time to put the plates together...chimichanga smothered with melted white cheese, refried beans with a bit of shredded cheese sprinkled on top, yellow rice, lettuce, tomato, sour cream, and guacamole. Here are a few tips:
  1. Do not over fry the chimichanga.  They will be extra crunchy if you do. (speaking from experience)
  2. When you are draining the chimichanga, turn it on it's end to allow some of the extra oil that made its way inside to drain out.  
  3. You can also add a bit of fire to the meat stuffing by putting in some hot chilies or sprinkling it with red pepper. 
  4. If you do not have time to make refried beans from scratch, you can use a can of pinto beans.  Heat 1 tsp. of bacon grease in an iron skillet.  Pour in the whole can of pinto beans (juice and all) and use a potato masher to mash up the beans while they are "re-frying." Lightly sprinkle the beans with chili powder.  Add water to the mix if they are getting too dry and sticking to the skillet.  Savannah actually made the beans tonight. Using the canned pintos turned out much better than the "pre-smashed" variety of canned refried beans.  

Monday, April 25, 2011

What's For Dinner? - Baked Teriyaki Chicken

It has been a while since I have posted a recipe.  Honestly, I have just not had time to try new things or experiment around with cooking new meals.  However, tonight's meal was a keeper so I thought I would share.

I am a member of the Allrecipes.com site.  It is a sight that I have mentioned in the past as a great resource for recipe ideas.  You can find a recipe for just about anything.  If your looking for that wonderful recipe that your great great grandma used to make that everyone calls by a different name and you have never been able to figure out how to make, this is a great site to start your search.  All you have to do is type in the recipe name in the search.  For example, where I grew up we called this wonderful chocolate desert with chocolaty fudge icing by the name of Mississippi Mud Cake.  Since I grew up along the Mississippi, this name was fitting in our area.  However, many people know the same cake as Texas Sheet Cake. (I am sure there are probably other names for the same cake, too.)  That is where the site comes in handy because you can type in a recipe by whatever ol' name you know it as, and many times find just what you are looking for.

However, if that does not produce the results you need, there is a question and answer/recipe request area that you can use.  Just describe the type of recipe you are looking for and within a short time (usually), someone will respond.  I have never posted a question that someone has not at least attempted to answer.  And...most of the time the advice is great!  You can also use this area to get recipe ideas for a meal.  For instance, if you have some chicken thighs and don't know what to make, just ask the group for ideas.  You are notified through your email every time someone responds.

That brings me to today's recipe.  I am subscribed to a newsletter form Allrecipes.com, and this week one of the recipes caught my eye - Baked Teriyaki Chicken.  You can find the direct link to the recipe here.  We made it tonight, and  after taking a vote, the entire family agreed that this recipe was a keeper.  The only thing I would change next time would be to make about half again the amount of sauce.  My family really liked the sauce, and I made the meal with rice so a little extra sauce would have been a great addition for spreading on top of the rice.  In addition to the chicken and rice, we had broccoli, raw carrots and celery, and ice tea.  Unfortunately, I really did not know what to expect from the meal so I did not get any pictures, but the picture on the recipe site is actually pretty close to what it looks like except we did not have that much sauce.
Baked Teriyaki Chicken Recipe
Picture from Allrecipes.com website
Baked Teriyaki Chicken
1 Tbsp. Cornstarch
1 Tbsp. Cold Water
1/2 c. Sugar
1/2 c. Soy Sauce
1/4 c. Apple Cider Vinegar
1 Minced Garlic Clove
1/2 tsp. Ground Ginger
1/4 tsp. Black Pepper
12 Skinless Chicken Thighs

Directions:
Preheat oven to 425 degrees.  Combine all the above ingredients (except chicken) in a saucepan.  Let simmer, stirring frequently until the mixture boils and thickens.  Remove from the heat. Place the chicken thighs in a 9X13 pan and pour the sauce over the top of the chicken.  Turn the chicken  to make sure all sides are coated.  Bake 30 minutes.  Then turn the chicken and bake for an additional 30 minutes.  The recipe suggests to brush with sauce every 10 minutes.  However, I just returned the chicken about halfway through the last 30 minute baking segment to help re-coat it and keep it from drying out, and it was fine.  

When we made our chicken, I accidentally got a bag of chicken legs out of the freezer instead of thighs.  So we had about 6 chicken legs as well as 3 chicken thighs (not overly huge chicken thighs) in our 9X13 pan.  This worked out fine, and they cooked evenly.  As a matter of fact, I cut off about 5 minutes of cooking time, and the chicken was cooked to the perfect "done-ness" and was very moist.  So the cooking times will definitely vary according to your specific oven as well as the size of the chicken thighs that you have.  

Saturday, October 16, 2010

Pears, Pears, Yummy Pears!

Fall brings the cooler weather, the falling leaves, and the ripening pears.  On the back edge of the field connected to the east of our property, there is a field that has a couple of pear trees.  Three years ago when the ranch foreman first told us about the pears, we were able to stock up on loads of pears.  The tree was literally sagging with sweet, juicy pears.  We cut and froze pears, baked pear pies and pear crisp, and ate all the fresh pears that we could ever want.

The following year, we went back hoping to have the pears again.  There wasn't a single pear on the tree!
A couple of weeks ago, we knew that it was pear time again.  We did not have much hopes of having any good pears to eat, but we decided to make the mile trek through the fields to find out.  We started down the winding path of tall grass and weeds.  There were definitely pears this year, but they were still a little bitter and not quite ripe.  We waited a couple of weeks more and our efforts were rewarded.  Jason took our weed trimmer out and semi-cleared us a path so we at least did not have to walk through waist high grass. I also have to add that the mile sees to be much when you start back with a backpack full of pears!

The pears are still not quite as sweet or abundant as they were the first year, but they are pretty good.  So far, we have made some dried pears, pear crisp, poached pears (we did not care for poached pears much!), and cut up fresh pear snacks.  We have also put up about 7-8 quart bags of bears that we will later use for cooked pears over biscuits or pancakes.  I can also use the frozen pears in pear pie.
Dried Pears
We are headed back to the pears today with our truck.  Jason went out today to cut out some of the branches to make the path for the truck a little less "scratchier."  Hopefully, the pears will be fully ready to be picked and preserved!

Dried Pears
Thinly Slice pears and dip them in lemon juice.  Use a dehydrator according to manufacture directions.  It took our dehydrator about 4-5 hours to make the dried (almost crispy) pears.  You can use the pears for a snack or you can store them an rehydrate them for use later in a cake, pie, etc.  I have to say that I have never rehydrated the pears so I can not offer any personal experience/suggestions for that.  We always just eat ours for a snack...they would never last long enough at our house to use at a later date!

Pear Crisp
4-5 ripe Pears
1/4 cup quick cook oats
1/8 cup flour
1/2 cup brown sugar
1/4 tsp. cinnamon
1/2 to 3/4 cup butter (the more the better, right!)
Dash of nutmeg (optional)

Slice the pears (about 1/4 inch thick) and place them in a 9 inch baking dish.  Mix the dry ingredients together in a bowl.  Cut the stick of butter into pieces and use a pastry blender, fork, or 2 knives to cut the butter into the dry mixture.  Pour the mixture evenly over the pears.  Bake at 350 degrees until browned.  Serve hot with vanilla ice cream!

Thursday, October 7, 2010

What's for Dinner? - Toasted Ravioli

Toasted ravioli is a great tasting fun dish that you can use as an appetizer to a football game, a side dish at a dinner party, or a main dish served with pasta sauce and your favorite veggies.

A couple of weeks back, I was craving toasted ravioli.  I have no idea where the craving came from except that I saw a bag of ravioli at Wal-Mart one night and brought it home.  I have only had toasted ravioli one other time that I can remember, but I decided that I wanted to try to make some of my own.  I searched online and studied a couple of different recipes to get the idea of how I should go about making them (www.allrecipes.com is where I started).  One thing that I discovered is that the name "toasted" is a little deceptive!  The toasted ravioli should really be called fried ravioli!  Oh well, that did not keep us from making it.  Now, we have a new dish that the whole family enjoys.

Toasted Ravioli
1 package frozen ravioli
3/4 cup bread crumbs
1/4 tsp. garlic
1/8 tsp. salt
Dash of pepper
1/8 tsp.Italian seasoning
1 egg
3/4 cup milk
Oil for frying
Parmesan cheese

Place the ravioli on a tray about an hour to an hour an a half in advance to allow it to thaw.  When your ready to begin making your toasted ravioli, heat the oil in your fryer (or pan to) 400 degrees.  Mix the bread crumbs, garlic, salt, and Italian seasoning together in a bowl.  Beat the egg in a separate bowl and mix in the milk.  Dip each piece of ravioli in the milk/egg mixture and then roll it in the bread crumb mixture.  Fry the ravioli 5-8 pieces at a time, depending upon the size of your fryer for 2-3 minutes, flipping them half way through the cooking time.  Remove the ravioli when it is golden brown.  Place on a paper towel to drain.  Sprinkle tops with Parmesan cheese.

Tips:

  1. The Italian seasoning is optional.  As a matter of fact, we only use a small 1/8 tsp. amount because our family is not crazy about a strong Italian seasoning flavor.
  2. Tip for frying: If you do not have a thermostat and are not sure if your oil is hot enough, sprinkle a small amount of flour in the oil.  If it sizzles (fries), then you know that it is ready.  You want to make sure your oil is hot enough before you begin frying.  If the oil is not hot enough,  the coating will fall off the ravioli.    
  3. Turn your oven to 175 degrees and keep your finished ravioli in a 9X13 pan in the heated oven to keep them warm while you are making the remaining ravioli.  
  4. We usually purchase a bag of meat ravioli as well as the cheese ravioli.  (Half the family likes one, the other half likes the other!)  This recipe works well with both kinds.
  5. You can make extra and use a toaster over to re-heat them and crisp them back up for a snack.
  6. Serve the ravioli warm with your favorite jar of pasta sauce or ranch dressing for a dip.

Sunday, October 3, 2010

What's for Dinner? - Hot Spiced Apple Cider

When we were at Wal-Mart, I saw a display of the gallon jugs of apple cider.  I asked the kids if they had ever tried it.  When they said "no," we decided it was time to give it a try.  We made a spiced hot apple cider for our Fall Fun Day this past week.  It was delicious.  Here is what we did:

Hot Spiced Apple Cider
1 quart apple cider
2 cinnamon sticks
1/8 tsp. ground cloves
1/8 tsp. orange extract flavoring
Dash of nutmeg
2-3 Sweetener packets to sweeten (honey or sugar works also depending on your preference)

Mix all the ingredients together in a pan.  Heat over medium heat until boiling.  Turn off the heat and let it steep in the pan with the lid on.  We made ours a couple of hours in advance to let the flavors set in.  Serve hot.

Tips:

  1. If you are planning on needing to keep your cider warm for an extended period of time, you can use a crock pot to keep the drink warm for several hours without having to worry about it scorching on the stove.  
  2. It is also fun to warm and drink the cider by the camp fire on a cool evening.  We just set up our campfire with a place to put our pan.  It stayed hot and ready to drink!  
  3. The longer our cider sat, the stronger the flavor became...so, you may need to add unseasoned cider to tone it down after a while.
  4. Orange juice will work in substitution for the orange flavored extract.  You will need to use more orange juice because the orange juice is not as strong in flavor as the extract.  I have also heard of people using pineapple juice, but I have not tried it yet.

Sunday, September 5, 2010

What's for Dinner - Homemade Apple Pie

I love the smell of a fresh baked apple pie with the apple and cinnamon scents that flow through the house.  It is a great fall smell.  Yesterday while JJ and I were shopping for our Labor Day meal, we found some Gala apples that were on sale.  JJ and I decided that we needed an apple pie to go with our home made ice cream so we bought a couple of bags of apples with the promise of fresh baked apple pie for our cook out.

While there are many different recipes to make an apple pie, I thought I would share the way we make ours here at the Holman house with pictures to follow our adventure.
First, you need to gather the ingredients:
2 cups Flour
1 tsp. Salt
2/3 cups shortening or real butter
6 table spoons of ice cold water
5 Medium apples peeled, cored, and sliced
1 stick REAL butter
about 1 cup sugar
approximately 2 tsp. cinnamon

We begin by mixing the flour and salt together in a large bowl.  Make sure you do not pack down your flour in your measuring cup or you will have too dense of dough which will come out tough.

Next, you add your shortening or butter.  If you are using shortening, make sure it is very cold.  I usually put mine in the refrigerator for some time to make sure it is hardened. Pie crust is a pastry so when you use the very cold shortening or butter, it helps your crust take on a flakier texture.  It allows the fat to stay together when you cut it into your flour leaving "air pockets" when baking.  The idea is that the small solid pieces of fat that are left after mixing will melt under the baking heat.  In effect, it leaves the air pocket behind allowing for a flakier crust.

Cut in your shortening/butter into your flour with a pastry blender until your shortening/butter pieces are pea size or less.  Do not overwork your shortening or you will defeat the purpose of leaving the tiny chunks for air pockets.

Next you add the ice cold water.  When I begin to make the pie crust, I put water in a measuring container with ice cubes to ensure it is really cold. Mix in the water.

This next trick is a big plus for me.  I do not necessarily like the mess of first mixing my pie crust.  So, I actually watched a Martha Stewart video one time and discovered a way to avoid the initial "kneading" of the dough.

Take plastic wrap and spread a large piece on the counter/table.
 After you have the water slightly worked into the dough (where it is still crumbly), pour the contents into the center of the plastic wrap.  Begin folding each side of the plastic wrap into the center and pressing downward.  Continue this process alternating the sides of the plastic wrap until the dough is mixed well.  This brings up another point...when making pastry doughs, another trick to creating flaky layers is to fold your dough over and press down when you are kneading it.

You fold a side, press it down.  Then, take another side and fold it in, repeating the process until the dough looks smooth. This creates "folded" layers of dough.


Again...do not over work your dough, or you will have a tough pie crust.


Ready for the fridge
Next, wrap the dough tightly in your plastic wrap and place it in the refrigerator to allow the worked dough to firm up.


After the dough has set in the refrigerator for a while, take it out and divide it into halves.

The dough actually forms layers


Roll the dough out in a circular form large enough to fit into the pie pan and allowing a slight edge of dough to hang over the top edge of the pan. Make sure you flour your surface well and check it occasionally while you are rolling it out to prevent it from sticking to your counter.

Now, you use your prepared apples pieces to fill your pie pan.  So I will take a break and go over that step.

For the apples, we use our apple peeler, corer, slicer tool.  It is a great tool that we found for a few dollars at a thrift store recently.  It was well worth the purchase...especially if you are one to "put-up" apples in the fall whether it be canning apple butter or freezing apple slices.  This machine takes off the skin, drills through the  core, and leaves you with nice clean even slices of apple.  It also works for pears.  We tried it our on one of the pears from our pear trees in the back field.  While they are not quite ripe enough yet, we were able to see that this tool will work great when we are ready to "put-up" pears this fall.  It beats having to do it with a paring knife!

Back to the pie:


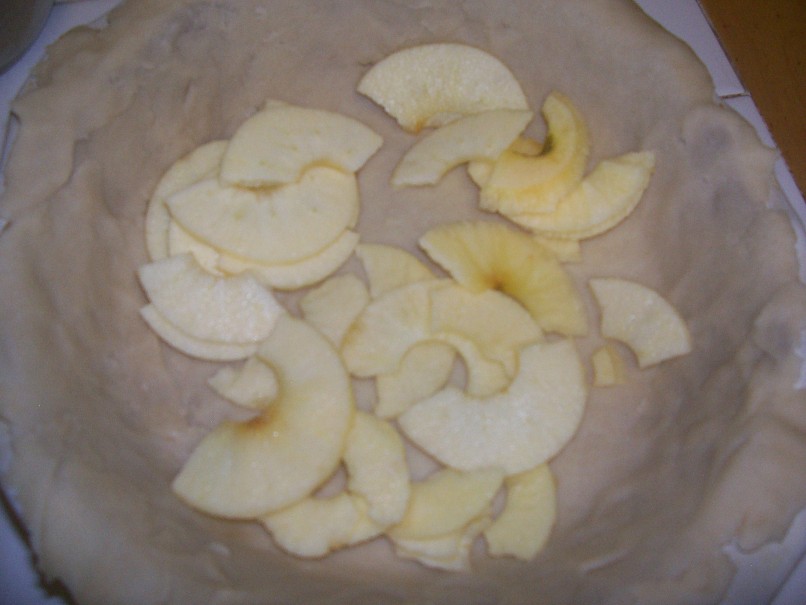
Place the peeled apples in the bottom crust. We used 5 medium apples for our pie.

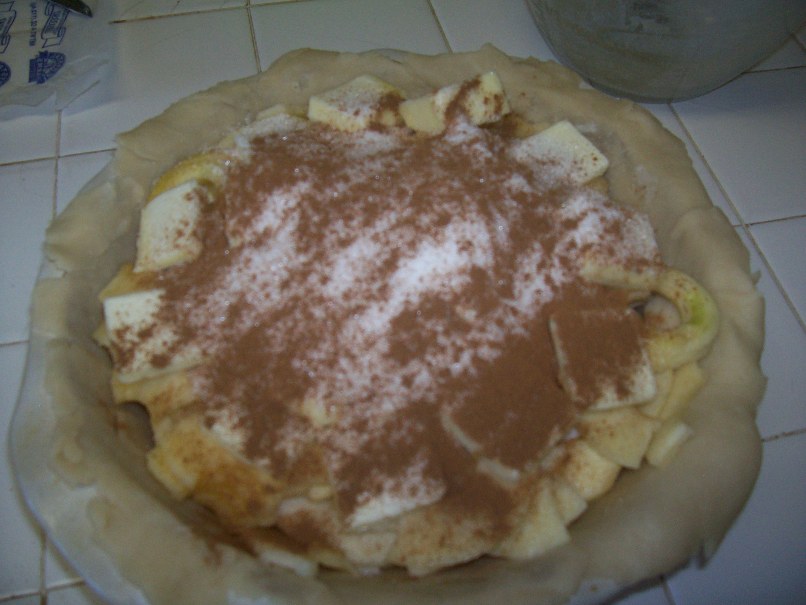
Top the apples with 1 stick of real butter cut into slices.  Add about 3/4 cup of granulated sugar and sprinkle the top with cinnamon.


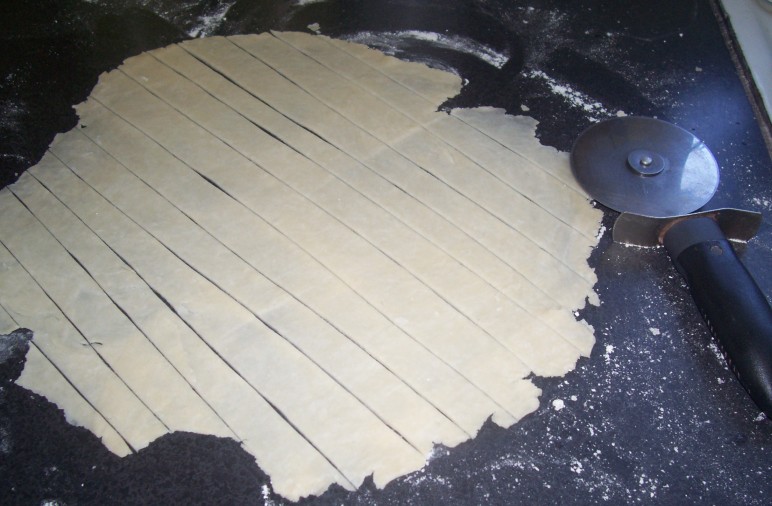
Roll out your remaining half of pie crust.  At this point you can either make a solid topped pie crust and just lay the whole crust piece on top of the pie and press together, or you can make a fancy lattice work topper.  I found a website that has great directions for making a lattice crust (Simple Recipes Lattice Pie Crust Directions).  We like the look of our lattice pies.  I use a pizza cutter to make my lattice pieces. It is quicker and usually allows me to get them more even and straighter.

Next, sprinkle the top of the pie lightly with sugar and bake at 350 degrees until it is light golden brown.

Serve hot with vanilla ice cream!

Saturday, August 28, 2010

What's for Dinner? - Easy Buttery Crunch Chicken

Allrecipes.com is a wonderful source for cooking ideas and questions, finding unique recipes, and sharing your own personal experiences.  There is a great question and answer forum that I have used many times in the past to find answers to various questions.  If you open an account, you can also save recipes that you like or want to try in your own personal "cookbook" area.  


The following recipe is a quick and easy dish that I discovered on allrecipes.com.  It is called Famous Butter Chicken on their site.  Everyone in my family loves when I make this recipe, and it can be fixed with very little time or effort on my part.


Famous Butter Chicken - Easy Buttery Crunch Chicken
Ingredients
  • 2 eggs, beaten
  • 1 cup crushed buttery round cracker crumbs (Ritz style)
  • 1/2 teaspoon garlic salt
  • ground black pepper to taste
  • 4 skinless, boneless chicken breast halves
  • 1/2 cup butter, cut into pieces
  • Directions
  1. Preheat oven to 375 degrees F (190 degrees C).
  2. Place eggs and cracker crumbs in two separate shallow bowls. Mix cracker crumbs with garlic salt and pepper. Dip chicken in the eggs, then dredge in the crumb mixture to coat.
  3. Arrange coated chicken in a 9x13 inch baking dish. Place pieces of butter around the chicken.
  4. Bake in the preheated oven for 40 minutes, or until chicken is no longer pink and juices run clear.

Tips:
  1. I always make more than the recipe calls for (usually 6-8 chicken breast halves for the 4 of us).  It doesn't seem to go very far no matter how much I make.  JJ absolutely loves this chicken and will eat it until it is gone if we let him.
  2. I use real butter for this recipe.  I have not tried margarine, but I believe it will work as well.  We just like the saltier real butter flavor.  
  3. The garlic salt is not detected in this recipe.  So, if you have an aversion to garlic, don't worry because the flavor is not strong in it.
  4. Pour the remaining cracker crumbs over the chicken before adding the butter pieces just to add the extra crunch and prevent wasting the leftover cracker crumbs.
  5. Lay the pieces/slices of butter directly on top of the chicken.  I usually place 2 slices on each piece of chicken (or one if the pieces are small chicken tender size cuts).  This seems to distribute the butter more evenly.