Well...I have to say that having a school room set aside is a great addition to our learning experience. We all seem to be enjoying school so much morer. Daddy is even more involved since he is teaching the morning class first thing each day. We all make sure we are up and dress for school to start on-time!
Our schedule is really working well also. We have our set aside times for each subject as well as our breaks, and we ALWAYS follow the break schedule. The kids make sure of that! J
We have changed/added a few different school books since the beginning of the school year. For JJ, we added the Pathway Reading Series. While he was enjoying the Harcourt reading book, I decided to get him a reading series with a corresponding workbook that would allow me to better check his writing and comprehension. This way I have a pre-designed set of questions (and answers) that I can use and be able to have him answer instead of having to make up everything. It is a real time saver for me. Also, the Pathway series was the series that I used with my daughter when she was in 2nd grade. The series is put out by the Amish. J.J. had already completed one of the books last year, and my husband and I like the series and decided we did not want to miss the opportunity for J.J. to use the rest of the set, too.
We also added the Abeka Language book. We were doing the Emma Serl Primary Language Lessons, but we had reached the half-way point in the book which is where 3rd grade begins. The writing/reading portion of the remaining lessons are in cursive which we are just beginning. Instead of having a daily language session that was extra taxing as far as the amount of writing required and having to decipher cursive, we decided to begin the Abeka Language for 2nd grade. The Abeka Language focuses more on grammar and will give him extra practice on sentence structure and the parts of a sentence. This will be a great addition to his curriculum (and he really likes it!).
Savannah also has had a couple of changes. We decided to go ahead and get her going on a reading curriculum. She wanted to continue in the Pathway Readers series as well, so we purchased the 5th grade reader and accompanying workbook. She really enjoys this series. The book she is currently using is Book 5: Living Together. I guess one of the things that my husband and I have always liked about this series is that they are "simple" (not as in easy, but as in the simple life) stories that teach little lessons along the way. The stories are based on Amish farms, schools, and communities. Savannah has always liked the vast amount of stories dealing with animals.
We also went to a sale this weekend and found an Abeka Language Book B (5th Grade) for Savannah. I was able to purchase the teacher's answer book as well as the student workbook for only $10.88. She will be using this book in addition to her Emma Serl Intermediate Language Lesson book. The Abeka workbooks once again have more of a grammar study base. She will be learning more sentence structure and basics. She will even learn diagraming sentences which I have to say she will probably actually enjoy!
We have also decided to put Saxon math aside for the time being. We switched to Saxon math because Savannah absolutely hated Abeka. However, I have found that Saxon is set up much along the same lines as Abeka. The main difference is that Abeka is much more advanced than Saxon grade level wise. I will talk more about what we are now using for math in a later post.
That about sums it up. I think we are set for the rest of the year. We are all settled into our daily routine, and we are all satisfied with our current curriculum choices. And....there are only 2 weeks left in 1st quarter! Only 3 more to go! J

Monday, September 27, 2010
Divisibility Rules Chart
Savannah is deep in the heart of division, fractions, and factoring in school. We have been reviewing the divisibility rules for numbers. (FYI: Divisibility rules are the little "helper rules" that are used to figure out easy ways to know if numbers can be divided by another number.) I found a great mathematics divisibility tool/sheet on a website. It has a list of all the diivisibility rules for the numbers up to 11. The site is here: Divisibility rule site.
I took the sites information and made a compilation of the rules on a pdf to print out for Savannah's use. It's a nice sheet to have around when you are looking to factor a number or when you are just trying to find a common denominator between 2 fractions. We taped the rules sheet right in front of her so that she always has it available.
I took the sites information and made a compilation of the rules on a pdf to print out for Savannah's use. It's a nice sheet to have around when you are looking to factor a number or when you are just trying to find a common denominator between 2 fractions. We taped the rules sheet right in front of her so that she always has it available.
Saturday, September 18, 2010
Story of the World - The Egyptians
In our Story of the World, we are studying the early Egyptians. It has been a very exciting study so far. To think about the building of the pyramids and the overall complexity of the Egyptian culture is amazing. Take for instance their architecture...they built these HUGE pyramids without any of the equipment that we use today. Of course, it took a lot more time and human effort to build these great wonders, but their tools, while much more primitive than ours today, accomplished these pyramids with intricate tunnels equip with "traps" to try to protect the Pharaoh's stash.
One of the activities that we did this week was the carving of an amulet. We carved the scarab beetle, kehper,which was a sacred symbol to the Egyptian people. You can read more about the myth of the scarab beetle here. We also read a book from the library entitled The Scarab's Secret by Nick Would. (Find the Book here)
For our activity, we took a bar of white soap and first drew the picture of a scarab on the top. The pencil did not actually leave a pencil marked drawing, rather it left an indented path. We then used a steak knife to carve around the beetle to make is stand out on the top half of the soap. Tip: We used the cheap Jergens soap. It worked really well because it was soft enough to carve yet firm enough to hold up to the carving.
Here are our results:


Thursday, September 16, 2010
2nd and 5th Grade Combined Home School Schedule
One of the things that I am always searching for is a way to schedule my school day that will incorporate 2 different grade levels. As an elementary school teacher in a public school classroom, you only have one grade to schedule at a time. You teach all your children at the same time and have somewhat of a schedule already set for you with all the "extra" classes and recesses that are scheduled by grade level. However, one of the most difficult things for me in scheduling our school day is trying to schedule both of my kids during the day so that I can help them and teach them the necessary classes without one child's learning interfering with the other.
I have personally searched online for sample schedules to use or at least base our schedule off. I have found some schedules from other home schoolers, but I have never really found any that specifically fit our needs or have come even close. I realize different families have different age groups, different subjects, different focuses, etc. I just wanted to find another example from some one of a schedule that worked for them.
This past week, I spent a lot of time working on and developing a written schedule for us to follow. It allows me to work with each child during their more oral based teaching lessons while the other child is doing their written work. It gives us a set time to know what we are to do and what is expected. After trying it out on day one and adjusting the times accordingly, the following is what we have decided works best for us:
5th Grade Home School Schedule
Here is Savannah's Schedule:
TIME | Subject |
7:15 | Rise and Shine! |
Get dressed, Make bed, Pick up Room | |
7:45-8:15 | Breakfast and Teeth Brushed |
8:25-8:50 | MWF - Bible with Dad |
8:50-9:00 | T-Th - Personal Study Calendar |
9:00-9:30 | Intermediate Language Lessons |
9:30-10:00 | MWF - Typer Island |
T-TH Writing Book | |
10:00-10:15 | Language Workbook |
10:15-10:30 | Break |
10:30-11:00 | History with Mom |
11:00-12:00 | Math with Mom |
12:00-1:00 | Lunch |
1:00-1:40 | Reading |
1:40-2:00 | Spelling |
2:00-2:30 | Science |
2:30-3:00 | M - Cleaning Day |
T - Physical Education | |
W - Music | |
Th - Art | |
F - Free Time |
2nd Grade Home School Schedule
Here is JJ's Schedule(Same early schedule 7:15-9:00):
9:00-9:30 | Math with Mom |
9:30-9:50 | Science |
9:50:10:15 | Spelling |
10:15-10:30 | Break |
10:30-11:00 | History with Mom |
11:00-12:00 | Language Arts, Oral Phonics, Handwriting, |
12:00-1:00 | Explode the Code Lunch |
1:00-1:30 | Reading with Mom |
1:30-2:00 | Typer Island |
2:00-2:30 | Complete Daily Work and Learning at Home |
2:30-3:00 | M - Cleaning Day |
T - Physical Education | |
W - Music | |
Th - Art | |
F - Free Time |
When we first presented the schedule the first thing JJ read was... "Hmm... Break... uh.... lunch .... breakfast." Those are his favorite times!
Of course, these are just sample schedules. This is what we will aim for each day. There are definitely days that will require change and variation...like tomorrow morning's dentist appointment. Some days it will take us more time, some days it will take less. However, the great thing about our schedule is that it seems the days are already running smoother after only 4 days.
For a while, I tried to have a more relaxed schedule, but that is when it seemed that things became more difficult in our classroom. I thrive on a schedule and a prepared day, and my children seem to work better, too! I need the structure and so do my chidlren. That is not to say that we will not have our off days, rather it helps me know that as long as I am doing my part as a teacher and providing an environment conducive to learning and the kids are doing their part by working to the best of their ability, everyone is happier in the long run!
Home School - New Schedule, New Room
This past Monday marked a new day in the Holman house. School has been a little rough this couple of weeks. One of our biggest problems this year seemed to be our "school room" situation. We have been using our kitchen for the last 2 years for our studies. This has worked well up until this year. However, as the kids are getting older and bigger, this area has shrunk. Between the bigger books that they have now (especially Savannah's books!) and the multiple notebooks for each subject, I found that our work area was becoming very frustrating.
This past weekend, Jason decided it was time to make some changes. I was waiting to move our bed back into our room from the living room until we had finished painting and redecorating our bedroom. I had the bedroom mostly cleaned out just waiting for the paint. However, with me working and doing school, painting the bedroom had been put on the back burner.
This past Saturday, Jason took matters into his own hands and painted my room for me. (I dreaded painting this room. Thank you for helping me Jason even though it was not your idea to paint in the first place. For this I am forever grateful!!!)
He also decided that it was time to try something new with our school set-up. He decided to turn our living room into a school room. We still have our television in one corner with our recliner, but everything else has been moved out to make room for our school things. We have our central table for our together work and for me to use as a desk with our "calendar and morning area" behind that. Savannah has a separate work station with her books with her schedule attached to the side. JJ has his own desk with his schedule attached on top (attached with clear contact paper), and his books are on the book shelf set aside as his shelf area. They each received their own new pencil box with all the school items that they need on a daily basis. We hung various posters around the room and bought a 3X4 white board/dry erase board for our board activities.
As far as the schedule, we redesigned our daily schedule (which I will post later). The kids have their times for each subject so that they know when they are working with mom, how much time they have to finish each subject before it becomes homework, and when their breaks are. While we do leave room for schedule adjustment, we have stuck pretty close to the exact schedule so far, and I have to say that the last 3 days have gone very smoothly. The kids know exactly what is expected of them, and their is no question as to what they should be doing and when because they have a schedule. Hmm...organization! I feel better already.
Here are a few pictures of our new school room:
That is about it. The set up of our room makes life so much easier. All of my school things are in one place, and we do not have to put all our books away in another room every time we have lunch during a school day. Thank you again Jason for coming up with the idea for our school room and for helping me set it up!
This past weekend, Jason decided it was time to make some changes. I was waiting to move our bed back into our room from the living room until we had finished painting and redecorating our bedroom. I had the bedroom mostly cleaned out just waiting for the paint. However, with me working and doing school, painting the bedroom had been put on the back burner.
This past Saturday, Jason took matters into his own hands and painted my room for me. (I dreaded painting this room. Thank you for helping me Jason even though it was not your idea to paint in the first place. For this I am forever grateful!!!)
 |
| Group Table and Mom's Teaching Area |
As far as the schedule, we redesigned our daily schedule (which I will post later). The kids have their times for each subject so that they know when they are working with mom, how much time they have to finish each subject before it becomes homework, and when their breaks are. While we do leave room for schedule adjustment, we have stuck pretty close to the exact schedule so far, and I have to say that the last 3 days have gone very smoothly. The kids know exactly what is expected of them, and their is no question as to what they should be doing and when because they have a schedule. Hmm...organization! I feel better already.
Here are a few pictures of our new school room:
 |
| White Board, Graph Poster Paper, and World Map |
 |
| Morning Calendar Activities Including Roman Numeral Date, Tally Marks, Date in two forms, Temperature, and Number of School Days |
 |
| Savannah's Work |
 |
| Savannah's Schedule |
 |
| JJ's Work Station |
 |
| JJ's Desk and Schedule |
 |
| Books and File Cabinet with Supplies All in one area! |
 |
| "A" Paper Post A star is earned for each A paper. The end of the week we add it up for school bucks for the School Store! |
 |
| Job Chart Record daily completion of chores |
Saturday, September 11, 2010
Another Great Home School Site - Spelling Bee
This is just the week for finding websites for me. Maybe it is because we have our internet back up and going, and I can actually hunt for new ideas for our schooling.
Last night, I was browsing through various school sites looking for new ideas and ran across a new site for spelling. It is an interactive spelling bee that has learning levels from grades 1 to 12, and you choose your level accordingly. The site is www.learner.org (clicking on this link will take you directly to the interactive spelling be). I actually had fun last night playing on it myself. However, the upper levels of spelling get really difficult!
The site gives you a paragraph with words blanked out. You can listen to the paragraph being read aloud and then click on the individual box to have the spelling word repeated. You type the word in the box, and when you are finished with all the word blanks, you click done. It immediately grades your performance and lets you know the ones you missed, the correct spelling (when you click on the missed word), and the definition of the word. It is a great learning tool. We will be using it for our spelling in our Fun Friday activities!
Wednesday, September 8, 2010
Another Great site - Preschool Letter list
I was reading through some of the posts on a forum that I am a part of, and someone had posted a site with preschool suggestions. The site is called Letteroftheweek.com. There is a section on the site that has each of the letters of the alphabet listed, and when you click into a letter, it has a nice list of activities for that particular letter. There are even long vowel activities available. There is also a story of the week section, sound of the week section, and a preschool scheduling section.
Anyway, I thought I would pass the site along.
Anyway, I thought I would pass the site along.
Monday, September 6, 2010
Preschool Suggestions
A question that was recently posted in my blog was asking about Pre-K curriculum. When you go to look at curriculum for children, there is such a vast array of choices. Of course, every parent wants their child to be at the top of the game, and that is great. However, I have learned a very important lesson in schooling my 2 children.
A little background...
I came from an education background of being an elementary education teacher. I always had a very structured classroom, and in effect, my classroom ran very smoothly but lacked much in the "fun" department. Structure is very good, and I know that my class/home school would be very hectic without it. I carried this classroom structure into the teaching of my own two children. I would make out my weekly lesson plans and have my daily task list, and if we did not accomplish the list by the end of the week, it almost stressed me out because I felt like I had not done enough. Now, I look back and laugh because even as an elementary teacher, I always planned too much each week and forwarded the left overs(drew my arrows) to next week. It was always better to have too much rather than not enough when you have a class of 25 kids looking back at you.
I began home schooling my daughter at a very young age (about 3 or 3 1/2 for structured learning). We had our own little classroom set up, and we would sit at a table for hours on end and do workbooks and paper activities. There is nothing wrong with workbooks in my opinion, but now that I look back I wish I would have taken more time for hands on everyday life learning. Don't get me wrong...she did have fun times with various activities, but the book work far outweighed the hands-on learning. She never really complained much, and she was definitely learning a great deal, but now I wish I would have taken the time for more of the fun activities instead of focusing on how many school books we could finish.
As my second child came along, I learned that structure and fun could have a balance. For one thing, JJ was not one to just sit at the table and work on workbooks. He needed the more hands on approach. Plus, I realized that I was trying to teach on a regimented school schedule, and that I needed to make a change in my home. So, we focused more on using counting cubes and play dough and focused less on finishing a workbook. We did do our "book work" for the various subjects, but fun learning from a 4-year-olds perspective became integrated in our learning. I have to say that there are still times that I struggle with trying to make learning enjoyable, but when we hit a rut...I just stop and remind myself that it is a lot more fun to learn about the Nomads and build a hut out of sticks than it is to just read the print in black and white!
I make this long speech to say...Make sure learning is fun and enjoyable. There will be plenty of moments in life that your child will have to not necessarily "enjoy" their learning. Let your young ones still enjoy being a child because the days of book reports and essays are closer around the corner than you think.
With that said, here are some of the things that worked for us and that I did enjoy in our schooling for Pre-K. One book that I loved and that my children both loved was Teaching Your Child to Read in 100 Easy Lessons. It is a phenomenal book with a stratecy that definitely works. Even Jason (my husband) talks about how great this book is. It costs roughly $15-20, and can be ordered or purchased at Barnes and Noble or many other book stores. It can also be found online through EBay ($18.95 with free shipping EBay link) or Amazon.com ($14.95 but you pay the shipping Amazon.com link). You may even be able to find it at your local library. If they do, you will have the opportunity to "try it before you buy it" and see if it works for your child.
Teaching Your Child to Read in 100 Easy Lessons is a one-on-one adult-to-child reading book. My kids loved the stories, and they were both reading at a very early age. The funny thing is that it is not a bright colorful reading book. It is in black and white and has very few pictures. As a matter of fact, the pictures that do go with the stories, I would cover up with a post-it note until after they finished reading the story so they did not do any inventive reading by looking at the pictures. I was able to make sure they were actually reading that way.
The lessons each take about 15 minutes. Some lessons are a little harder than others. For those lessons, I sometimes had to do half of a lesson one day and the other half the next. Once again, you have to gage your own child's attention span and interest. I could always tell when my children had "shut down."
The book itself actually starts with the child learning the sound (not the actual letter) for the letter m. It continues to add letter sounds throughout the book and then eventually begins teaching them the actual letter. Both of my children already new the letters by sight recognition before we started this book, but I still followed the teaching by sound method that the book used. I have know several people who have used this book and can judge it upon first-hand experience when I say that this book really works. Both of my kids are excellent readers, both read above grade level, and I attribute it to this book. It is a GREAT book!
As far as other learning, I created an alphabet book with both of my children. We did a letter a week and chose activities based upon that letter. Here are some examples that we did for the letter Aa.
As far as other books to use for preschool, I have found that up until about grade 2 or 3, the Sam's Club full curriculum books are great. They are very inexpensive (about $7-10 each), colorful, and incorporate all the subjects in one book. You can do a page a day or two a day or pick a subject a day or a couple of subjects.
Finally, the internet has a vast array of sources that can be found, too. Here are some great pre-school sites:
Starfall
PBS Kids
PlaykidsGames.com
Internet 4 Classrooms (lists a great many resources for Pre-K as well as other grades)
Scholsatic Games
HoodaMath (This is a little more advanced)
Homeschool Resource List (Site full of links to various educational sites)
That about sums up my Preschool suggestions. Playdough, stringing beads, even just practing holding a pencil or a paintbrush all help in the developing dexterity and cooridination at preschool ages. So, get out the cookie cutters and the pastry pin and cute out letters, numbers, shapes and animals...Most of all have fun watching your child learn!
A little background...
I came from an education background of being an elementary education teacher. I always had a very structured classroom, and in effect, my classroom ran very smoothly but lacked much in the "fun" department. Structure is very good, and I know that my class/home school would be very hectic without it. I carried this classroom structure into the teaching of my own two children. I would make out my weekly lesson plans and have my daily task list, and if we did not accomplish the list by the end of the week, it almost stressed me out because I felt like I had not done enough. Now, I look back and laugh because even as an elementary teacher, I always planned too much each week and forwarded the left overs(drew my arrows) to next week. It was always better to have too much rather than not enough when you have a class of 25 kids looking back at you.
I began home schooling my daughter at a very young age (about 3 or 3 1/2 for structured learning). We had our own little classroom set up, and we would sit at a table for hours on end and do workbooks and paper activities. There is nothing wrong with workbooks in my opinion, but now that I look back I wish I would have taken more time for hands on everyday life learning. Don't get me wrong...she did have fun times with various activities, but the book work far outweighed the hands-on learning. She never really complained much, and she was definitely learning a great deal, but now I wish I would have taken the time for more of the fun activities instead of focusing on how many school books we could finish.
As my second child came along, I learned that structure and fun could have a balance. For one thing, JJ was not one to just sit at the table and work on workbooks. He needed the more hands on approach. Plus, I realized that I was trying to teach on a regimented school schedule, and that I needed to make a change in my home. So, we focused more on using counting cubes and play dough and focused less on finishing a workbook. We did do our "book work" for the various subjects, but fun learning from a 4-year-olds perspective became integrated in our learning. I have to say that there are still times that I struggle with trying to make learning enjoyable, but when we hit a rut...I just stop and remind myself that it is a lot more fun to learn about the Nomads and build a hut out of sticks than it is to just read the print in black and white!
I make this long speech to say...Make sure learning is fun and enjoyable. There will be plenty of moments in life that your child will have to not necessarily "enjoy" their learning. Let your young ones still enjoy being a child because the days of book reports and essays are closer around the corner than you think.
With that said, here are some of the things that worked for us and that I did enjoy in our schooling for Pre-K. One book that I loved and that my children both loved was Teaching Your Child to Read in 100 Easy Lessons. It is a phenomenal book with a stratecy that definitely works. Even Jason (my husband) talks about how great this book is. It costs roughly $15-20, and can be ordered or purchased at Barnes and Noble or many other book stores. It can also be found online through EBay ($18.95 with free shipping EBay link) or Amazon.com ($14.95 but you pay the shipping Amazon.com link). You may even be able to find it at your local library. If they do, you will have the opportunity to "try it before you buy it" and see if it works for your child.
Teaching Your Child to Read in 100 Easy Lessons is a one-on-one adult-to-child reading book. My kids loved the stories, and they were both reading at a very early age. The funny thing is that it is not a bright colorful reading book. It is in black and white and has very few pictures. As a matter of fact, the pictures that do go with the stories, I would cover up with a post-it note until after they finished reading the story so they did not do any inventive reading by looking at the pictures. I was able to make sure they were actually reading that way.
The lessons each take about 15 minutes. Some lessons are a little harder than others. For those lessons, I sometimes had to do half of a lesson one day and the other half the next. Once again, you have to gage your own child's attention span and interest. I could always tell when my children had "shut down."
The book itself actually starts with the child learning the sound (not the actual letter) for the letter m. It continues to add letter sounds throughout the book and then eventually begins teaching them the actual letter. Both of my children already new the letters by sight recognition before we started this book, but I still followed the teaching by sound method that the book used. I have know several people who have used this book and can judge it upon first-hand experience when I say that this book really works. Both of my kids are excellent readers, both read above grade level, and I attribute it to this book. It is a GREAT book!
As far as other learning, I created an alphabet book with both of my children. We did a letter a week and chose activities based upon that letter. Here are some examples that we did for the letter Aa.
Letter Aa
- Print out a large letter Aa on computer using Microsoft Word. Use the outline feature in font. This will create a letter that you can have them color. You can also have them glue apple jacks to the picture.
- Find a poem or make one up with letter Aa to memorize. It is amazing how much a child can remember and how much fun memorization can be!
- Make an Apple Jack necklace.
- Eat apple slices and talk about Johnny Appleseed.
- Cut an apple across the middle and see the apple star that appears in the the seed center.
- Bake an apple pie...yes this is definitely an advanced activity, but it is well worth it and begins training your child at an early age for cooking!
- We had a page for magazine cut outs for each letter. The page consisted of pictures cut from a magazin that began with an Aa (or whatever letter we were studying), and we found Aa words in the magazine and glued them on, too.
- We used page of student writing paper and practiced writing several capital A's and lower case a's. We did as many as the child's age and attention span/hand strength would allow.
- Finally we would take typing paper and draw our own a pictures...alligators, apples, etc.. I would let them think of any Aa words they could. and let them draw it on their picture. I would then label the picture so we could "see" the word but also so we always knew what the picture was! Later in the school year, as the kids dexterity and penmanship developed, I allowed them to use creative spelling to write it themselves.
As far as other books to use for preschool, I have found that up until about grade 2 or 3, the Sam's Club full curriculum books are great. They are very inexpensive (about $7-10 each), colorful, and incorporate all the subjects in one book. You can do a page a day or two a day or pick a subject a day or a couple of subjects.
Finally, the internet has a vast array of sources that can be found, too. Here are some great pre-school sites:
Starfall
PBS Kids
PlaykidsGames.com
Internet 4 Classrooms (lists a great many resources for Pre-K as well as other grades)
Scholsatic Games
HoodaMath (This is a little more advanced)
Homeschool Resource List (Site full of links to various educational sites)
That about sums up my Preschool suggestions. Playdough, stringing beads, even just practing holding a pencil or a paintbrush all help in the developing dexterity and cooridination at preschool ages. So, get out the cookie cutters and the pastry pin and cute out letters, numbers, shapes and animals...Most of all have fun watching your child learn!
Sunday, September 5, 2010
What's for Dinner - Homemade Apple Pie

While there are many different recipes to make an apple pie, I thought I would share the way we make ours here at the Holman house with pictures to follow our adventure.
First, you need to gather the ingredients:
2 cups Flour
1 tsp. Salt
2/3 cups shortening or real butter
6 table spoons of ice cold water
5 Medium apples peeled, cored, and sliced
1 stick REAL butter
about 1 cup sugar
approximately 2 tsp. cinnamon
We begin by mixing the flour and salt together in a large bowl. Make sure you do not pack down your flour in your measuring cup or you will have too dense of dough which will come out tough.

Cut in your shortening/butter into your flour with a pastry blender until your shortening/butter pieces are pea size or less. Do not overwork your shortening or you will defeat the purpose of leaving the tiny chunks for air pockets.
 Next you add the ice cold water. When I begin to make the pie crust, I put water in a measuring container with ice cubes to ensure it is really cold. Mix in the water.
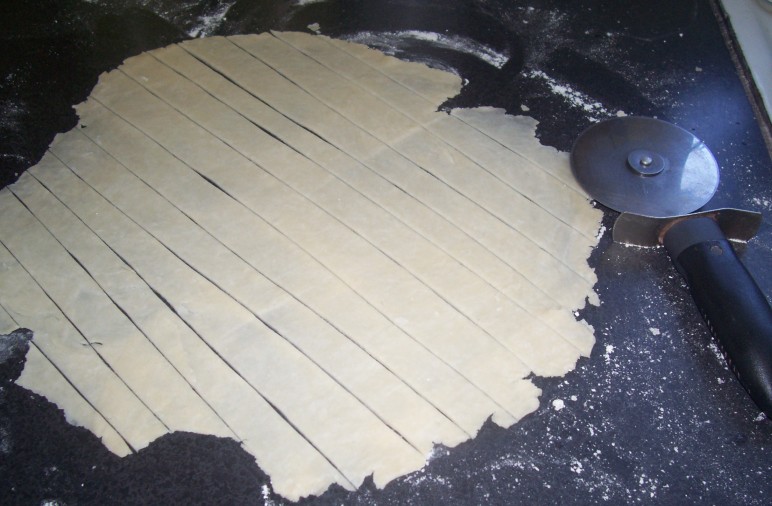
This next trick is a big plus for me. I do not necessarily like the mess of first mixing my pie crust. So, I actually watched a Martha Stewart video one time and discovered a way to avoid the initial "kneading" of the dough.
Take plastic wrap and spread a large piece on the counter/table.
 After you have the water slightly worked into the dough (where it is still crumbly), pour the contents into the center of the plastic wrap. Begin folding each side of the plastic wrap into the center and pressing downward. Continue this process alternating the sides of the plastic wrap until the dough is mixed well. This brings up another point...when making pastry doughs, another trick to creating flaky layers is to fold your dough over and press down when you are kneading it.
You fold a side, press it down. Then, take another side and fold it in, repeating the process until the dough looks smooth. This creates "folded" layers of dough.
 Again...do not over work your dough, or you will have a tough pie crust.
 |
| Ready for the fridge |
After the dough has set in the refrigerator for a while, take it out and divide it into halves.
 |
| The dough actually forms layers |

Roll the dough out in a circular form large enough to fit into the pie pan and allowing a slight edge of dough to hang over the top edge of the pan. Make sure you flour your surface well and check it occasionally while you are rolling it out to prevent it from sticking to your counter.
Now, you use your prepared apples pieces to fill your pie pan. So I will take a break and go over that step.

 For the apples, we use our apple peeler, corer, slicer tool. It is a great tool that we found for a few dollars at a thrift store recently. It was well worth the purchase...especially if you are one to "put-up" apples in the fall whether it be canning apple butter or freezing apple slices. This machine takes off the skin, drills through the core, and leaves you with nice clean even slices of apple. It also works for pears. We tried it our on one of the pears from our pear trees in the back field. While they are not quite ripe enough yet, we were able to see that this tool will work great when we are ready to "put-up" pears this fall. It beats having to do it with a paring knife!
Back to the pie:
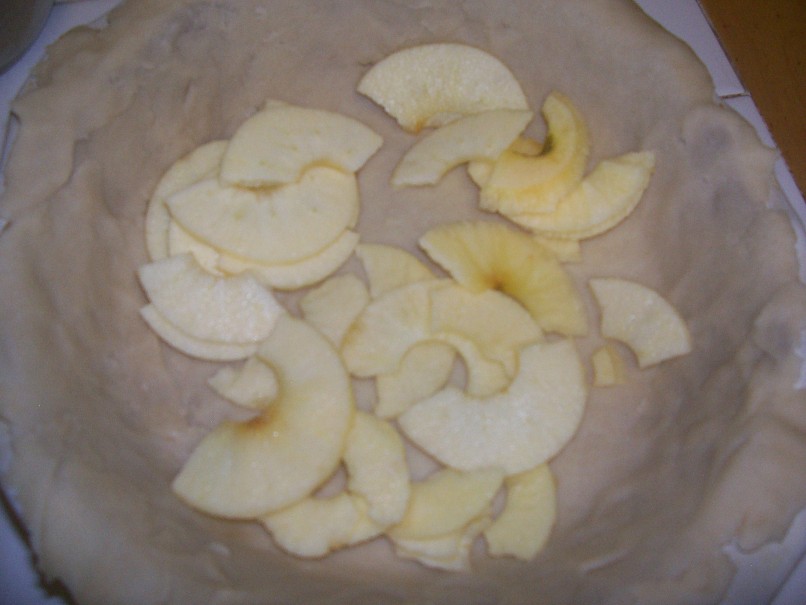

Place the peeled apples in the bottom crust. We used 5 medium apples for our pie.
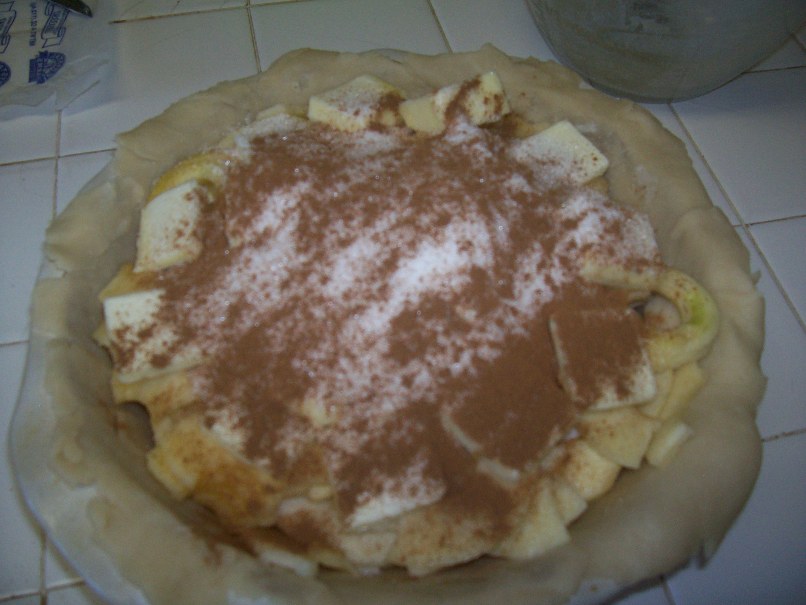

Next, sprinkle the top of the pie lightly with sugar and bake at 350 degrees until it is light golden brown.

Serve hot with vanilla ice cream!


Wednesday, September 1, 2010
Paint update!
Well, I have finished the living room and kitchen painting. I do have to say...it was a lot of work. The kitchen was time consuming because we had to have multiple layers of paint on the cabinets to cover the "country blue" that was previously there. Here are some before and after pictures:
Here is the finished product:
 |
| Doorway |
 |
| Table and entry way |
 |
| Upper Cabinets |
 |
| Corner Area |
 |
| Wall after first layer of paint on the chair rail high blur |
 |
| Lower kitchen cabinets after first layer of yellow |
 |
| Finished lower cabinets |
We took off the upper cabinet doors that were useless space. When the people put in the new ceiling, they put runners down the ceiling. This, in effect, blocked the upper cabinets from being able to open. We only had access to 2 of them and never used them because they were dark and dingy. We decided to open them up and paint them. Now they just store my big kitchen items. We took out the mini-blinds, and now our back window opens up into an open cow pasture so the only thing that would see through that window from the outside was the cows! I am currently looking for material that I like to be able to make a valance for the window and door.


The below pitcure shows the rolling cabinet (to the right of the stove) that Jason is in the process of finishing for me. He is going to top it with counter top. It is on wheels because there is actually a hidden cabinet that is in the corner, and it is the access to our bathroom pipes that is located on the other side of this wall. I also painted my spice rack (originally dark wood in color) to match the cabinets.

Everything else (base boards and walls) have been painted Shetland Grey. It actually looks white unless you hold a bright white up to it then you can see the faintest hint of grey.

That about sums up the kitchen. It is so much nicer than it was. Before, it was very dark and depressing. Now, we have our own bit of sunshine when we walk in the kitchen.

Final cost for the kitchen was $7.48 on half price rack at Wal-mart and many hours of painting (3 coats in all). We only had to purchase the white paint because we had the yellow left over from painting the kids doll house a couple of years ago.
Later, I will show the finished product of the living room and hopefully the bedroom as well as talk about the importance and reasons for purchasing high quality paint.
Subscribe to:
Posts (Atom)